Creating Row Level Security in Power BI
Learn the step-by-step guide on how to set up static row-level security in Power BI in this article.
Row-level security (RLS) remains an effective tool in Power BI that enables you to control who sees what data in your reports and dashboards. It allows you to define specific rules for each user, determining which rows of data they can view. This ensures people only see the information they’re supposed to, based on their job or permissions.
Row-level security (RLS) is a two-step method that starts in the Power BI Desktop and finishes in the Power BI Service. (Source: Pragmatic Works)

Introduction
Think of Row-level security (RLS) as a virtual curtain that displays only the information someone is allowed to see, based on their role or permission.
Why is Row-Level Security Important in Power BI?
Imagine you’re sharing a report with your team. Not everyone should see every piece of data, right? Row-level security ensures that people only see the data that’s relevant to their job or responsibilities. It’s like giving each person a personalized view of the data without affecting others. This is super important when you have sensitive or confidential information that needs to be kept private.
When is Row-Level Security Used?
RLS is used when you want to create different views of the same report for different groups of people. For example:
In a sales report, salespeople should only see data related to their region or products.
In an employee report, managers might see all employees while regular employees only see their own info.
In a school report, teachers could see only their class data.
Types of Row-Level Security in Power BI:
There are two main types of RLS in Power BI:
Filter-based RLS or Static RLS: This is like putting a filter on the data. Users see only what the filter allows them to see. For instance, a manager might have a filter that shows only data related to their department.
Username-based RLS or Dynamic RLS: Here, you set up rules based on a person’s username. So, each person can see only the data that matches their username’s rules.
In this article, I’ll walk you through a step-by-step guide on how to set up static row-level security in Power BI.
Creating a Sample Report
For this guide, I use a sales sample data source. You can download it from here.
First, we’ll import the dataset into the Power BI dashboard as it is, without making any changes in the Power Query editor. After that, we’ll proceed to create various types of charts to showcase the sales data. Additionally, we’ll include slicers that provide the option to filter the data based on different countries.
Setting Up User Roles in Power BI Desktop
In this step, we’ll set up a role for Olabisi, who is a sales representative in Canada and Sunbo, a sales representative in the UK. Creating these roles will make sure Olabisi and Sunbo can see the data for their own countries.
To set up the roles:
Navitage to the Modeling Tag
2. Click on Manage roles
On the Manage Roles window, we have three tabs.
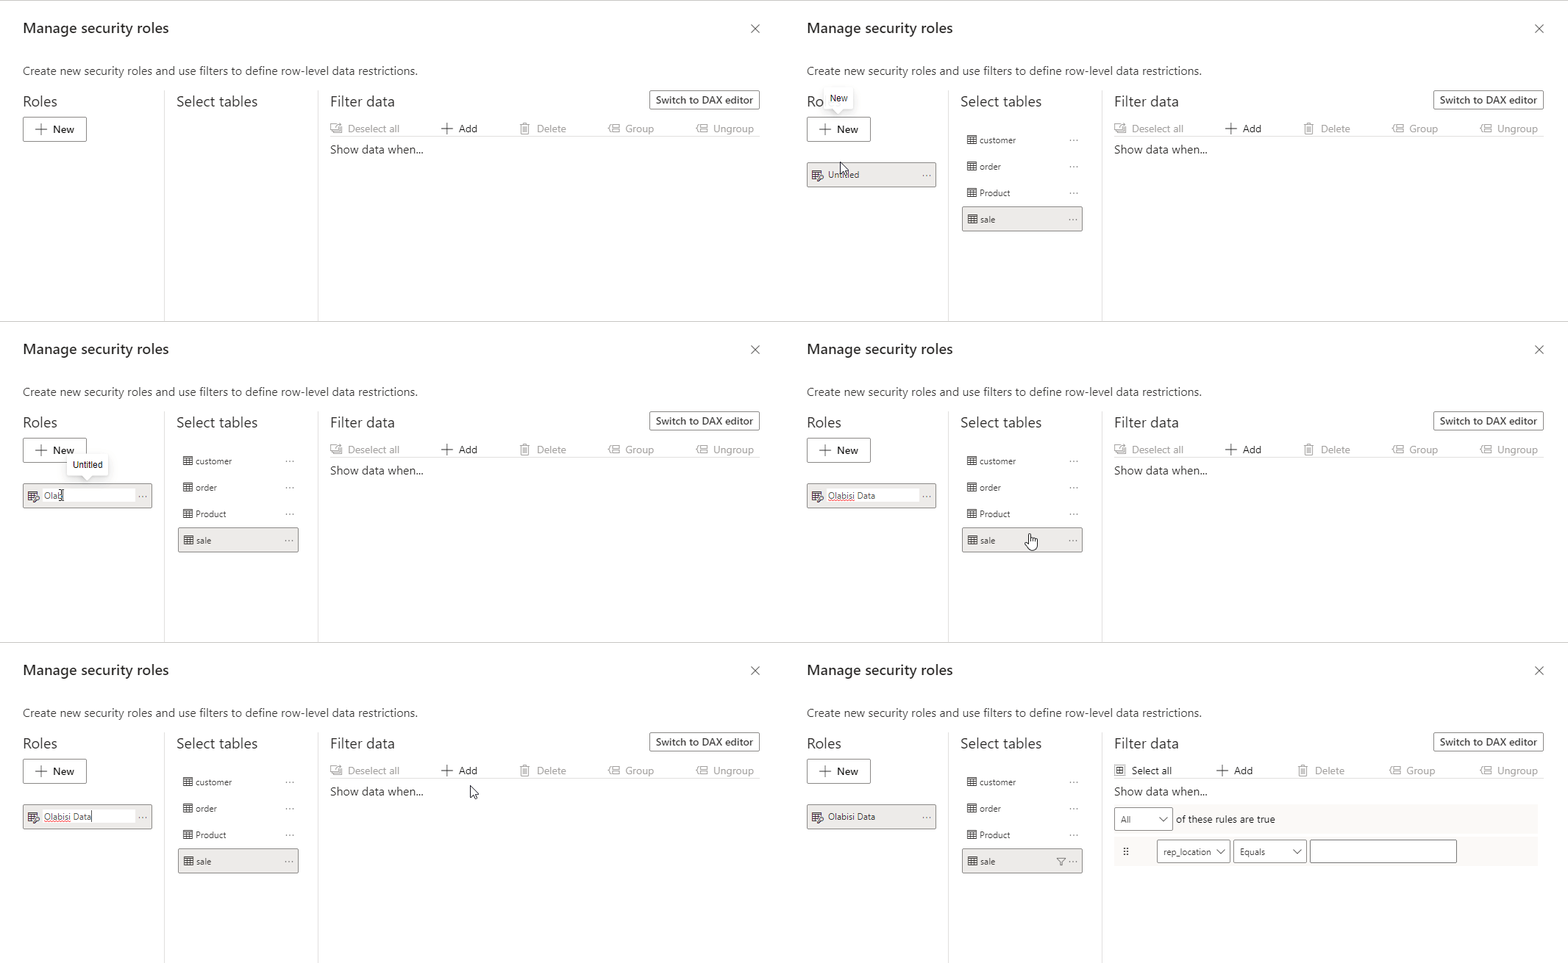
In this window, you have the ability to make new roles, view the tables in your model that you want to apply the rule and apply filters to the data using either the DAX editor or the enhanced row-level security editor.
3. Working on the Manage roles window
Here, we will click on the +New to create a role for Olabisi and name it Olabisi Data, let's select the table we want to apply the filter on (sales table) and we will create a filter using the enhanced editor by clicking on +Add
Next, we’ll get more precise by picking the column in the table where we want the rule to apply. We’ll zoom in on the “rep_location” column for filtering. Then, we’ll set the condition to “Equals” and type in “Canada” as the country and click Save. Remember, our aim is to make sure Olabisi only sees data from his region, Canada.
Create a role for Sunbo, a UK sales representative, for some practice.Remember naming the role Sunbo Data.
Testing our role in Power BI Desktop
Great! Now that we’ve made two example roles, we can try them out in Power BI Desktop by using the “View As” menu option.
Now, we’ll take a look at the report using the roles we made for Olabisi and Sunbo, named “Olabisi Data” and “Sunbo Data.” This way, we’ll make sure Olabisi and Sunbo only see data that pertains to their respective regions.
On the “View As” window, select Olabisi Data and click ok
You’ll notice that only sales details for Olabisi are displayed, showing a total sales amount of $882K and a total quantity ordered of 21. There are also other charts related to Olabisi’s sales details.
For some practice. use the “View as” option to see Sunbo sales details.
To return to the normal view click on the “stop viewing” at the top right of the dashboard.
Before we move forward, we should publish our dashboard on the Power BI Service.
Manage User Roles in Power BI Service
To manage security for the data model, we’ll head to the workspace where we saved our report in the Power BI Service and then follow these steps:
Navigate to the “Security” option of the dataset
The Security takes you to the Role-Level Security page where you add members to a role you created in Power BI Desktop.
2. Adding members
In this section, we’ll find the roles we made in Power BI Desktop and assign them to Power BI accounts within our organization.
For “Olabisi Data,” we will choose his Power BI account to assign the role to him and click Save.
You can remove selected members by clicking on “x” next to their name.
For some practice. assign a Power Bi account for Sunbo Data
Testing our role in Power BI Service
To test the role, click on the three dots button (…) next to each role, and then choose “Test as role.”
Using “Test As Role” will display the report in a viewing mode specific to that role.
Try out different roles, by choosing “Now viewing as.”
For some practice. test the role Sunbo Data.
Summary
Row-level security in Power BI remains a vital feature that ensures data privacy and customized access. By following these steps, you can create roles, assign permissions, and control data visibility, making your reports more secure and relevant to unique users.


